If you’re hosting websites with OpenLiteSpeed Server through aaPanel, you’re already enjoying speed and flexibility. But in today’s web environment, performance isn’t enough security is essential.
That’s where ModSecurity comes in. It acts like a protective shield for your server, blocking malicious traffic before it can harm your site. In this guide, you’ll learn how to enable and configure ModSecurity with OpenLiteSpeed using aaPanel, step by step.
Table of Contents
What Is ModSecurity?
ModSecurity is an open-source Web Application Firewall (WAF). It monitors incoming HTTP requests and filters out harmful activity like SQL injections, cross-site scripting (XSS), and other common attacks.
It works by applying a set of rules to every request. If something looks suspicious, ModSecurity blocks it or logs it for review. It’s like having a security guard at the front door of your website.
How ModSecurity Protects Your Site
- Blocks known attack patterns (SQLi, XSS, etc.)
- Logs suspicious activity for analysiss
- Uses OWASP Core Rule Set (CRS) to detect threats
- Adds an extra layer of defense beyond firewalls and SSL
Step-by-Step Setup Guide
Verify ModSecurity Is Installed
Run this command to check your OpenLiteSpeed version and modules:
/usr/local/lsws/bin/lshttpd -vYou should see something like:
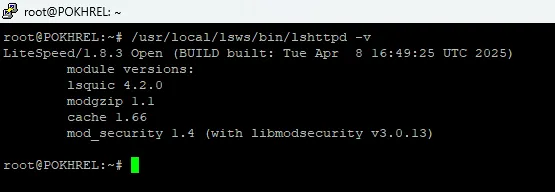
LiteSpeed/1.8.3 Open ...
mod_security 1.4 (with libmodsecurity v3.0.13)
If mod_security is listed, you’re ready to proceed.
Check Module File
Verify the ModSecurity module file exists:
ls -l /usr/local/lsws/modules/mod_security.soExpected output should show proper permissions like -rwxr-xr-x.
Temporarily Unlock OpenLiteSpeed Admin Panel Config
aaPanel locks the OpenLiteSpeed configuration files by default when you log in through the panel using port 7080. To edit them, follow these steps:
- Open aaPanel and go to the App Store.
- Click on OpenLiteSpeed, then select the Config menu on the left side.
- Scroll to the bottom and locate these two lines:
include /www/server/panel/vhost/openlitespeed/*.conf
include /www/server/panel/vhost/openlitespeed/listen/*.conf- Comment them out by adding
#:
# include /www/server/panel/vhost/openlitespeed/*.conf
# include /www/server/panel/vhost/openlitespeed/listen/*.conf
This unlocks manual config editing. You’ll re-enable them later.
Add ModSecurity Module Block
To add the ModSecurity module in OpenLiteSpeed config:
- Open the OpenLiteSpeed Config.
- Locate the module cache block.
- After the module cache block, paste the following:
module mod_security {
  modsecurity on
  modsecurity_rules `
  SecRuleEngine On
  SecDebugLog /usr/local/lsws/logs/modsec.log
  SecDebugLogLevel 0
  `
  modsecurity_rules_file /usr/local/lsws/modsec/comodo/rules.conf
}
Save and restart OpenLiteSpeed.
Access OpenLiteSpeed Admin Panel
- Add port
7080to your firewall on aaPanle security if not already added - Visit
http://your-server-ip:7080 - If you haven’t set admin credentials, run:
/usr/local/lsws/admin/misc/admpass.shSet a username and password, then log in.
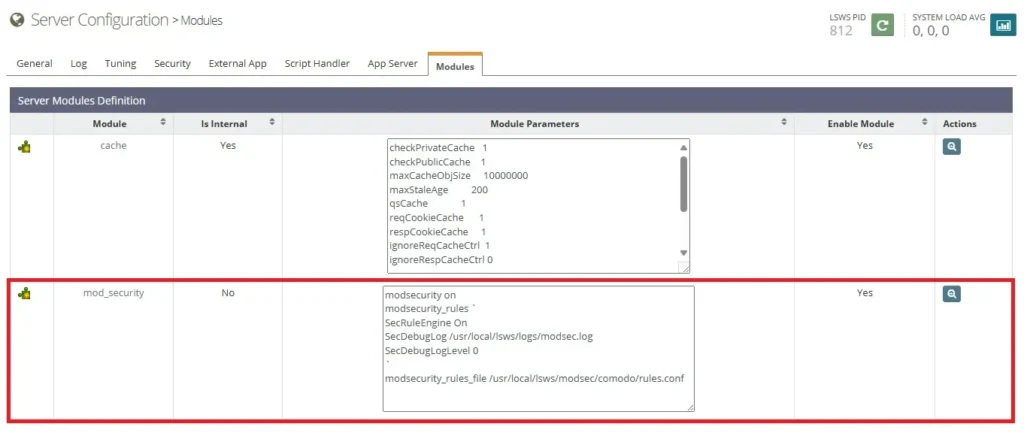
Enable ModSecurity in OpenLiteSpeed Server
After adding the mod_security block to the OpenLiteSpeed configuration, you will see mod_security listed in the OpenLiteSpeed Admin Panel under Server > Modules. To enable it, follow these steps:
- Visit
http://your-server-ip:7080 - Go to Server > Modules
- You should now see
mod_security - Click the Edit icon and Enable it
- Restart OpenLiteSpeed
Install OWASP Core Rule Set
Create the directory and clone the rules:
mkdir -p /usr/local/lsws/modsec/comodo
cd /usr/local/lsws/modsec/comodo
git clone https://github.com/coreruleset/coreruleset.git .
mv crs-setup.conf.example crs-setup.conf
Create Unified Rules File
Create rules.conf:
nano /usr/local/lsws/modsec/comodo/rules.confPaste:
Include /usr/local/lsws/modsec/comodo/crs-setup.conf
Include /usr/local/lsws/modsec/comodo/rules/*.conf
Save and exit.
Re-enable aaPanel Includes
Go back to the config file:
nano /usr/local/lsws/conf/httpd_config.confRemove the # from the two lines:
include /www/server/panel/vhost/openlitespeed/*.conf
include /www/server/panel/vhost/openlitespeed/listen/*.conf
Restart OpenLiteSpeed again:
/usr/local/lsws/bin/lswsctrl restartYour aaPanel-managed sites will now continue working with ModSecurity enabled.
WordPress Compatibility with ModSecurity CRS v4
If you’re running a WordPress site, ModSecurity can sometimes block legitimate actions especially when using the Gutenberg editor, REST API, or AJAX features. This can result in 403 errors when publishing posts or saving content.
To fix this while keeping your site secure, follow these steps:
Install the WordPress Rule Exclusions Plugin
OWASP CRS v4 includes a plugin system for common platforms. To install the official WordPress plugin:
cd /usr/local/lsws/modsec/comodo/plugins
git clone https://github.com/coreruleset/wordpress-rule-exclusions-plugin.git wordpress
Then include the plugin in your main rules file:
nano /usr/local/lsws/modsec/comodo/rules.confAdd this line at the top:
Include /usr/local/lsws/modsec/comodo/plugins/wordpress/plugins/wordpress-rule-exclusions-config.conf
Include /usr/local/lsws/modsec/comodo/plugins/wordpress/plugins/wordpress-rule-exclusions-before.conf
Restart OpenLiteSpeed:
/usr/local/lsws/bin/lswsctrl restartWhat This Fixes
- 403 errors when publishing or editing posts
- REST API blocks in the Site Health screen
- Gutenberg editor issues
- AJAX-based plugin features
Note: These exclusions only apply to specific WordPress paths. ModSecurity remains active for the rest of your site, protecting against SQL injection, XSS, and other threats.
Optional: Test ModSecurity
Try sending a malicious request:
curl http://yourdomain.com/?param=<script>alert(1)</script>Check the log:
We set SecDebugLogLevel to 0 above, so logs may not appear. If you want to see the logs, change the value from 0 to 3.
tail -f /usr/local/lsws/logs/modsec.logIf ModSecurity is working, you’ll see the request blocked or logged.
FAQs
Check the log file at /usr/local/lsws/logs/modsec.log.
Yes! Edit crs-setup.conf or add your own rules to rules.conf.
Minimal impact. The protection is worth it for most setups.
You can disable specific rules or adjust sensitivity.
Summary
In this guide, you:
- Verified ModSecurity is installed
- Unlocked aaPanel config
- Enabled ModSecurity in OpenLiteSpeed
- Installed OWASP Core Rule Set
- Installed WordPress Rule Exclusions Plugin
- Activated and tested the firewall
- Re-enabled aaPanel virtual host includes
Final Thoughts
If you love aaPanel but avoided using ModSecurity because of compatibility issues especially with OpenLiteSpeed I’ve got good news for you.
After spending an entire day testing every function, admin action, and REST API call, I’ve successfully configured ModSecurity to work perfectly with WordPress on OpenLiteSpeed through aaPanel. Everything now runs smoothly publishing, editing, AJAX, and Site Health without any 403 or JSON response errors.
If this helped you, say thanks in the comments and enjoy the security of ModSecurity without sacrificing WordPress functionality.
Thank you!

I just want to say thank you for this amazing guide! I searched everywhere even the official forums but couldn’t find anything this clear and step-by-step. I followed your instructions exactly and everything worked perfectly. You made a complicated setup feel easy. Really appreciate the time and effort you put into this. Keep up the great work!
Thanks a lot! I’m really happy to hear it helped you. I tried to make it as simple as possible, so it means a lot that it worked well for you. I appreciate your kind words!