The Samsung Galaxy A70 is a powerful and feature-packed smartphone, but sometimes its stock firmware may not meet your needs or preferences. Installing a custom ROM on your Galaxy A70 can bring new features, improvements, and a fresh look to your device.
Custom ROMs offer a way to customize your device and take full control of its software. In this article, we will discuss how to safely install a custom ROM on your Samsung Galaxy A70.

Table of Contents
What is Custom Rom?
Custom ROM is a modified version of the Android operating system that can be installed on a smartphone or tablet. These ROMs are created by third-party developers and are not affiliated with the device manufacturer or carrier. Custom ROMs offer a variety of benefits, including the ability to install unsupported apps, make system-level changes, and even enable features that are not available in the stock firmware.
Installing a Custom ROM
To install a custom ROM, you will need to install a custom recovery such as TWRP. If you haven’t done so already, you can find a full guide on how to unlock the bootloader and install TWRP by visiting the link provided below. This guide will provide you with step-by-step instructions on how to complete these essential steps before installing a custom ROM on your Samsung Galaxy A70.
Check this: How to Install TWRP Recovery on Samsung Galaxy A70
Downloading a Custom ROM for Your Samsung Galaxy A70
Once you have installed a custom recovery such as TWRP on your Samsung Galaxy A70, the next step is to download a custom ROM. There are several custom ROMs available for the Samsung Galaxy A70, each with its own unique features and improvements.
From below link you can get all latest ROMs available for the Galaxy A70:
Download: Custom ROM for Samsung Galaxy A70
The custom ROMs listed abovein list, such as LineageOS, Pixel Experience Plus, crDroid, riceDroid, AlphaDroid and Corvus OS, are known to be stable and offer a good balance of performance, features, and customization. We have provided a direct download link for the Samsung Galaxy A70, so you can easily get started with installing a custom ROM on your device.
Installing a Custom ROM on Your Samsung Galaxy A70
- Using a Custom Recovery
- Using ADB Sideload
When it comes to installing a custom ROM on your Samsung Galaxy A70, there are typically two methods that can be used: using a custom recovery or using ADB sideload. Both methods have their own advantages and disadvantages, and which one you choose will depend on your individual needs and preferences. In this section, we will go over each method in detail to help you decide which one is right for you.
Installing Custom ROM using Custom Recovery
Installing a custom ROM using a custom recovery is a simple and straightforward process that can be completed in a few steps. Before starting the installation, it is important to make sure that your phone is fully charged and that you have created a backup of any important data. Here is a step-by-step guide for installing a custom ROM using a custom recovery on your Samsung Galaxy A70:
- Power off your phone.
- Reboot to recovery mode by simultaneously pressing the Volume Up and Power buttons. Once you see the “Warning” screen, leave the buttons and press the Volume Up button once.
- In the TWRP recovery, go to “Wipe” and wipe the Dalvik Cache, Cache, System, Vendor and Data.
- After wiping is complete, go to “Install” and install the custom ROM ZIP file.
- If desired, you can also flash other ZIP files such as the MindTheGapps ZIP for Google apps or the Magisk ZIP for rooting.
- After flashing is complete, reboot your phone to the system.
With these steps, you should now have successfully installed a custom ROM on your Samsung Galaxy A70 using a custom recovery.
Installing Custom ROM using ADB Sideload
In order to install a custom ROM using ADB Sideload, you will need to have the Android SDK platform-tools on your computer. You will also need to have a custom recovery, such as LineageOS Recovery, Pixel Experience Recovery or riceDroid Recovery, installed on your device.
Additionally, make sure to enable the Developer Options and USB Debugging on your Samsung Galaxy A70 before proceeding with the installation process.
Download: Android SDK Platform Tools
Steps to install Custom ROM using ADB Sideload:

- Charge your Samsung Galaxy A70 and connect it to your computer via a USB cable.
- Extract the Android SDK Platform Tools and open the extracted folder.
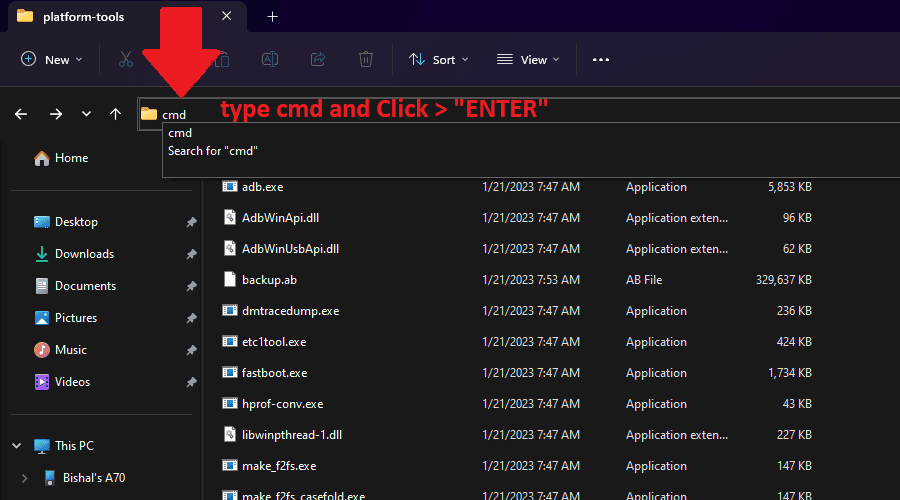
- Open the “Platform Tool” on your computer. (Like in Picture) Type “cmd” in top bat and hit enter.
- Enter the command “adb devices” to ensure your device is properly connected.
- Enter the command “adb reboot recovery” to boot your device into recovery mode.
- In recovery mode, select “Apply update via ADB”.
- On your computer, navigate to the folder where the custom ROM file is located and enter the command “adb sideload [ROM file name].zip”.
- Wait for the installation process to complete and then reboot your device.
Congratulations! You have successfully installed a custom ROM on your Samsung Galaxy A70. You should now be able to enjoy the new features, performance enhancements, and customizations that come with your chosen custom ROM. Keep in mind that custom ROMs may have some bugs and limitations, so be sure to check the forums for any known issues and to stay up to date with the latest updates. Enjoy your new custom ROM experience.
Check this: How to Install GSI Rom on Samsung Galaxy A70
Conclusion
In conclusion, installing a custom ROM on your Samsung Galaxy A70 can open up a world of new possibilities and customization options. Whether you choose to install a custom ROM using a custom recovery or through ADB sideload, it is important to carefully research each one to determine which one is right for you. With the right custom ROM, you can greatly improve your device’s performance, extend its battery life, and access a wide range of new features and functionalities. So go ahead and experiment with custom ROMs to get the most out of your Samsung Galaxy A70.
