Generic System Images (GSIs) are a great way to install a stock Android operating system on any device that supports Project Treble. This can be a great way to get a new version of Android on your device, or to try out a different flavor of Android.
However, before you can install a GSI, you need to understand a few things about how Android partitions work. In this article, we will discuss the different types of Android partitions, and how to install a GSI on a device with super, dynamic, A, or AB slots.
Table of Contents
What is a super partition?
A super partition is a single partition that contains multiple smaller partitions. This allows Android to store more data in a smaller space, and it also makes it easier to update the system. For example, a super partition could contain the system image, the vendor image, the product image, and the data partition.
What is a dynamic partition?
A dynamic partition is a type of super partition that can be resized on the fly. This means that Android can add or remove partitions as needed, without having to erase the entire device. For example, if you install a new app that requires more space, Android can resize the data partition to accommodate the new app.
What is an A slot?
An A slot is a partition that contains the Android system image. Devices with A slots have two slots, called A and B. The system image is always booted from the active slot. The inactive slot is used to store a backup of the system image.
What are AB slots?
AB slots are two slots, called A and B, that can be booted from either slot. This allows you to update your device without having to wipe it. When you update your device, the new system image is installed in slot B. You can then reboot your device and select slot B to boot from the new system image.
How to Check Which Partition Your Android Device is Using
- Connect your device to your computer in fastboot mode.
- Open a command prompt or terminal window and navigate to the directory where the Android SDK Platform-Tools are located.
- Run the following command:
fastboot getvar partition-typeThis command will return the type of partition that is currently active on your device. The possible values are:
- A: The device is using an A-only partition scheme.
- AB: The device is using an AB partition scheme.
- dynamic: The device is using a dynamic partition scheme.
- super: The device is using a super partition scheme.
If you are not sure which partition type your device is using, you can also use the following command:
fastboot getvar productThis command will return the product name of your device. You can then look up the product name in the Android Compatibility Definition Document: https://source.android.com/compatibility/android-cdd to find out the partition type that is supported for your device.
Different partition types and their features:
Here is a table summarizing the different partition types and their features:
| Partition Type | Features |
|---|---|
| A-only | Supports one system image. |
| AB | Supports two system images, which can be booted from either slot. |
| Dynamic | Supports multiple system images, which can be resized on the fly. |
| Super | Combines multiple partitions into a single partition, which can be flashed as a single image. |
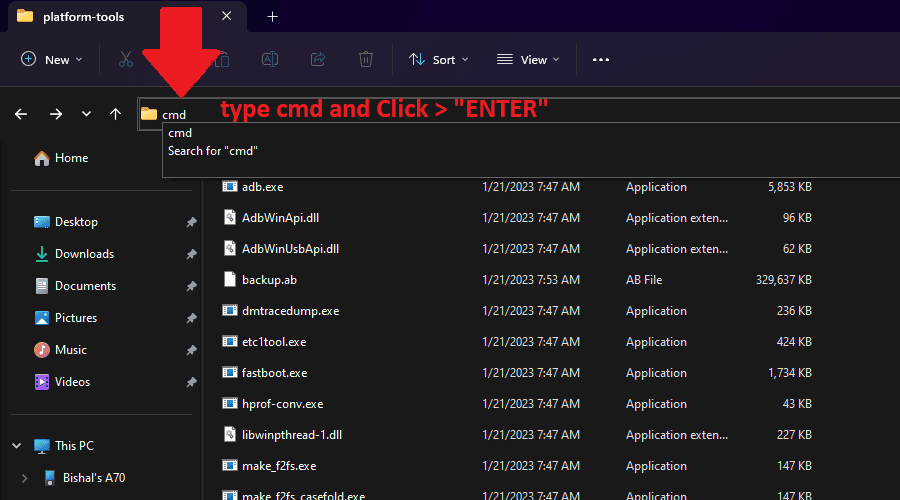
Downloading the SDK Platform Tool and Launching Command Prompt
- Download the SDK Platform Tool.
- Extracting and Opening the Folder.
- Launching Command Prompt from the Same Folder:
To execute commands for the SDK Platform Tool, you need to open a Command Prompt window from within the SDK Platform Tool folder. Follow these steps:
Windows: Open the extracted SDK Platform Tool folder. In the folder’s address bar (top bar), type “cmd” and press Enter. This will launch the Command Prompt window with the current directory set to the SDK Platform Tool folder.
macOS and Linux: Open the Terminal. Use the “cd” command to navigate to the extracted SDK Platform Tool folder. For example, if the folder is on your desktop, you would use the command cd ~/Desktop/sdk-platform-tool. Once you’re in the correct folder, you can proceed with using the Terminal for SDK Platform Tool commands.
Requirements
Download the necessary files from the links below:
Generic System Image (GSI): Download GSI
Verified Boot Metadata (vbmeta) Image: Download vbmeta
Installing GSI on AB Devices
Step 1. Device Connection and Verification
Connect your device to the computer in fastboot mode using a USB cable. Verify the connection by executing the following command:
fastboot devices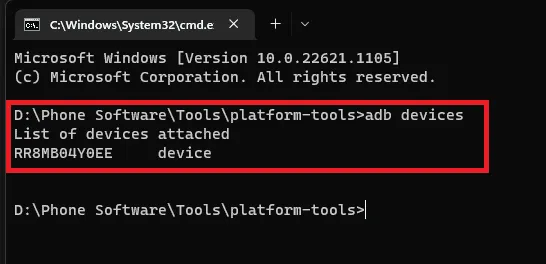
Step 2. Disable vbmeta Verification and Flash vbmeta Image
Disable vbmeta verification and flash the vbmeta image with the following command:
fastboot --disable-verification flash vbmeta vbmeta.imgStep 3. Reboot to Fastboot Mode
Reboot your device to fastboot mode using:
fastboot reboot fastbootStep 4. Check User Space
Check if your device is in userspace by running:
fastboot getvar is-userspaceStep 5. Erase System Partition
fastboot erase systemStep 6. Delete Logical Partitions
Delete logical partitions using the delete-logical-partition command. Replace product_insertslothere with the actual partition name, as shown in the example below:
fastboot delete-logical-partition product_a
fastboot delete-logical-partition product_b
Step 7. Flash the System Image
Flash the new system image onto your device:
fastboot flash system system.imgStep 8. Reboot to Recovery
Reboot your device into recovery mode:
fastboot reboot recoveryRemember to replace placeholders like vbmeta.img, system.img, product_insertslothere, product_a, product_b, and product with actual filenames or partition names relevant to your device and ROM.
Installing GSI on A-only Devices
Step 1. Device Connection and Verification
Connect your A-only device to the computer in fastboot mode and verify the connection:
fastboot devicesStep 2. Disable vbmeta Verification and Flash vbmeta Image
Disable vbmeta verification and flash the vbmeta image:
fastboot --disable-verification flash vbmeta vbmeta.imgStep 3. Reboot to Fastboot Mode
Reboot your device to fastboot mode:
fastboot reboot fastbootStep 4. Check User Space
Check if your device is in userspace:
fastboot getvar is-userspaceStep 5. Erase System Partition
Erase the existing system partition:
fastboot erase systemStep 6. Delete Logical Partition
Delete the logical partition using the delete-logical-partition command. Replace product with the actual partition name:
fastboot delete-logical-partition productStep 7. Flash the System Image
Flash the new system image onto your device:
fastboot flash system system.imgStep 8. Reboot to Recovery
Reboot your device into recovery mode:
fastboot reboot recoveryRemember to always back up your device before installing a GSI. This will protect your data in case anything goes wrong during the installation process.
Conclusion
In this article, we discussed the different types of Android partitions and how to install a GSI on a device with super, dynamic, A, or AB slots. We also provided detailed instructions on how to install a GSI on an AB device and an A-only device.
We hope this article was helpful! If you have any questions or problems, please feel free to ask in the comments section below. We are ready to help!
Excellent instruction! But my List of devices attached … field is empty. The drivers are installed, it is flashed through bat and determines the phone, and through adb … an empty field
Hi, thanks for your comment. I’m glad the instructions were helpful for the most part. It sounds like you’ve installed the drivers and flashed the phone successfully, but you’re still getting an empty list when you run
adb devices.One possibility is that you haven’t enabled USB debugging on your phone. You can do this by going to Settings > Developer options > USB debugging and turning it on. Once you’ve enabled USB debugging, try running
adb devicesagain.If that doesn’t work, there could be another issue with your drivers or your phone’s configuration.
Hello I love these steps but can you do how to install android 12 or 11 on samsubg A02s on twrp no fastboot thank you
The process of installing a GSI ROM using TWRP is the same for all devices. You can follow this guide step-by-step: https://magiskzip.com/how-to-install-android-13-on-any-project-treble-phones/#installing-android-13-using-custom-recovery
after repair in the workshop received back qualcomm edl recovery. How to return twrp / fastboot. How did the master get there?
Brother, I am tired of trying GSIs (Android 14 GSIs) on my Poco X3 Pro, it has super partition and I haven’t been able to install the GSI on it via the recovery (TWRP), fastboot and ADB sideload (I have tried them all) methods, can you help me?
You can easily install GSI on your Poco X3 Pro phone using ADB Fastboot. Follow this guide in the article, and if you need any help, message on the Our Telegram group where I’m available.
Can this be used for Samsung Galaxy Tab S2 8.0 (SM-T719)?
Thanks!
This guide is intended for ADB Fastboot supported devices, and unfortunately, Samsung does not support it. Therefore, this method is not suitable for your Samsung Galaxy Tab S2 8.0 (SM-T719). Instead, you can install it using custom recovery options such as TWRP, LineageOS recovery, etc.
Thank you for reaching out!
Thanks so much for your quick response. But do you think I can flash GSI custom ROM on this device (Samsung Galaxy Tab S2 8.0 [(SM-T719]) with TWRP?
Sorry for pestering you.
Thanks.
This is all still basic stuff.Can you explain how to resize the partition if the partition is too small
Can i flash gsi using eros without disable verify dm force im using samsung A50
Yes
Can gsi AB be flashed to A-ONLY?
Yeah, it’s not officially recommended, but if you’re just flashing the system image, it usually works fine on A-only devices. I’ve tested AB GSIs on a few A-only phones without any problems. Just make sure always back up first, just to be safe.