If you’re a Samsung Galaxy A13 user and looking to take your device to the next level, installing a custom recovery like TWRP is a great place to start. In this article, we’ll be providing a comprehensive guide on how to install TWRP on your Samsung Galaxy A13.
With TWRP installed, you’ll have the power to make advanced modifications to your device, such as installing custom ROMs, kernels, and other mods that aren’t available through the official firmware. Not only that, but TWRP also allows you to create and restore backups, making it easy to experiment with different software without worrying about losing your data. Additionally, TWRP also allows you to install zip files and other mods that can enhance your device’s performance and functionality.

So, if you’re ready to unlock the full potential of your Samsung Galaxy A13, follow along as we guide you through the TWRP installation process.
Table of Contents
Preparing Your Samsung Galaxy A13 for TWRP Installation
In this section, we will be preparing your Samsung Galaxy A13 for TWRP installation. This includes unlocking the bootloader, which is necessary for installing a custom recovery on your device. Additionally, we will also be enabling developer options, which will give you access to advanced settings and tools that will be needed for the TWRP installation process.
Before you begin, make sure to back up any important data on your device, as unlocking the bootloader will erase all data on the device. Also, keep in mind that unlocking the bootloader and installing a custom recovery will void your device’s warranty.
Should this Remember
Before proceeding with the TWRP installation on your Samsung Galaxy A13, make sure to complete the following steps:
- Disable all security locks on your device, such as pattern, PIN, or password.
- Take a full backup of your device, including all important files, contacts, and settings.
- Connect your Samsung Galaxy A13 to a PC with a USB cable, as the TWRP installation process will require the use of Odin software on a computer.
- Fully charge your device or make sure it has at least 50% battery remaining, to prevent interruption during the installation process.
- Use the original USB cable that came with your Samsung Galaxy A13, to ensure a stable connection between your device and the PC.
Unlock the Bootloader on Samsung Galaxy A13
First Step: Enable the Developer Options on Samsung Galaxy A13
To enable developer options on your Samsung Galaxy A13, follow these steps:
- Go to “Settings” on your device.
- Scroll down to the bottom of the screen and select “About phone”.
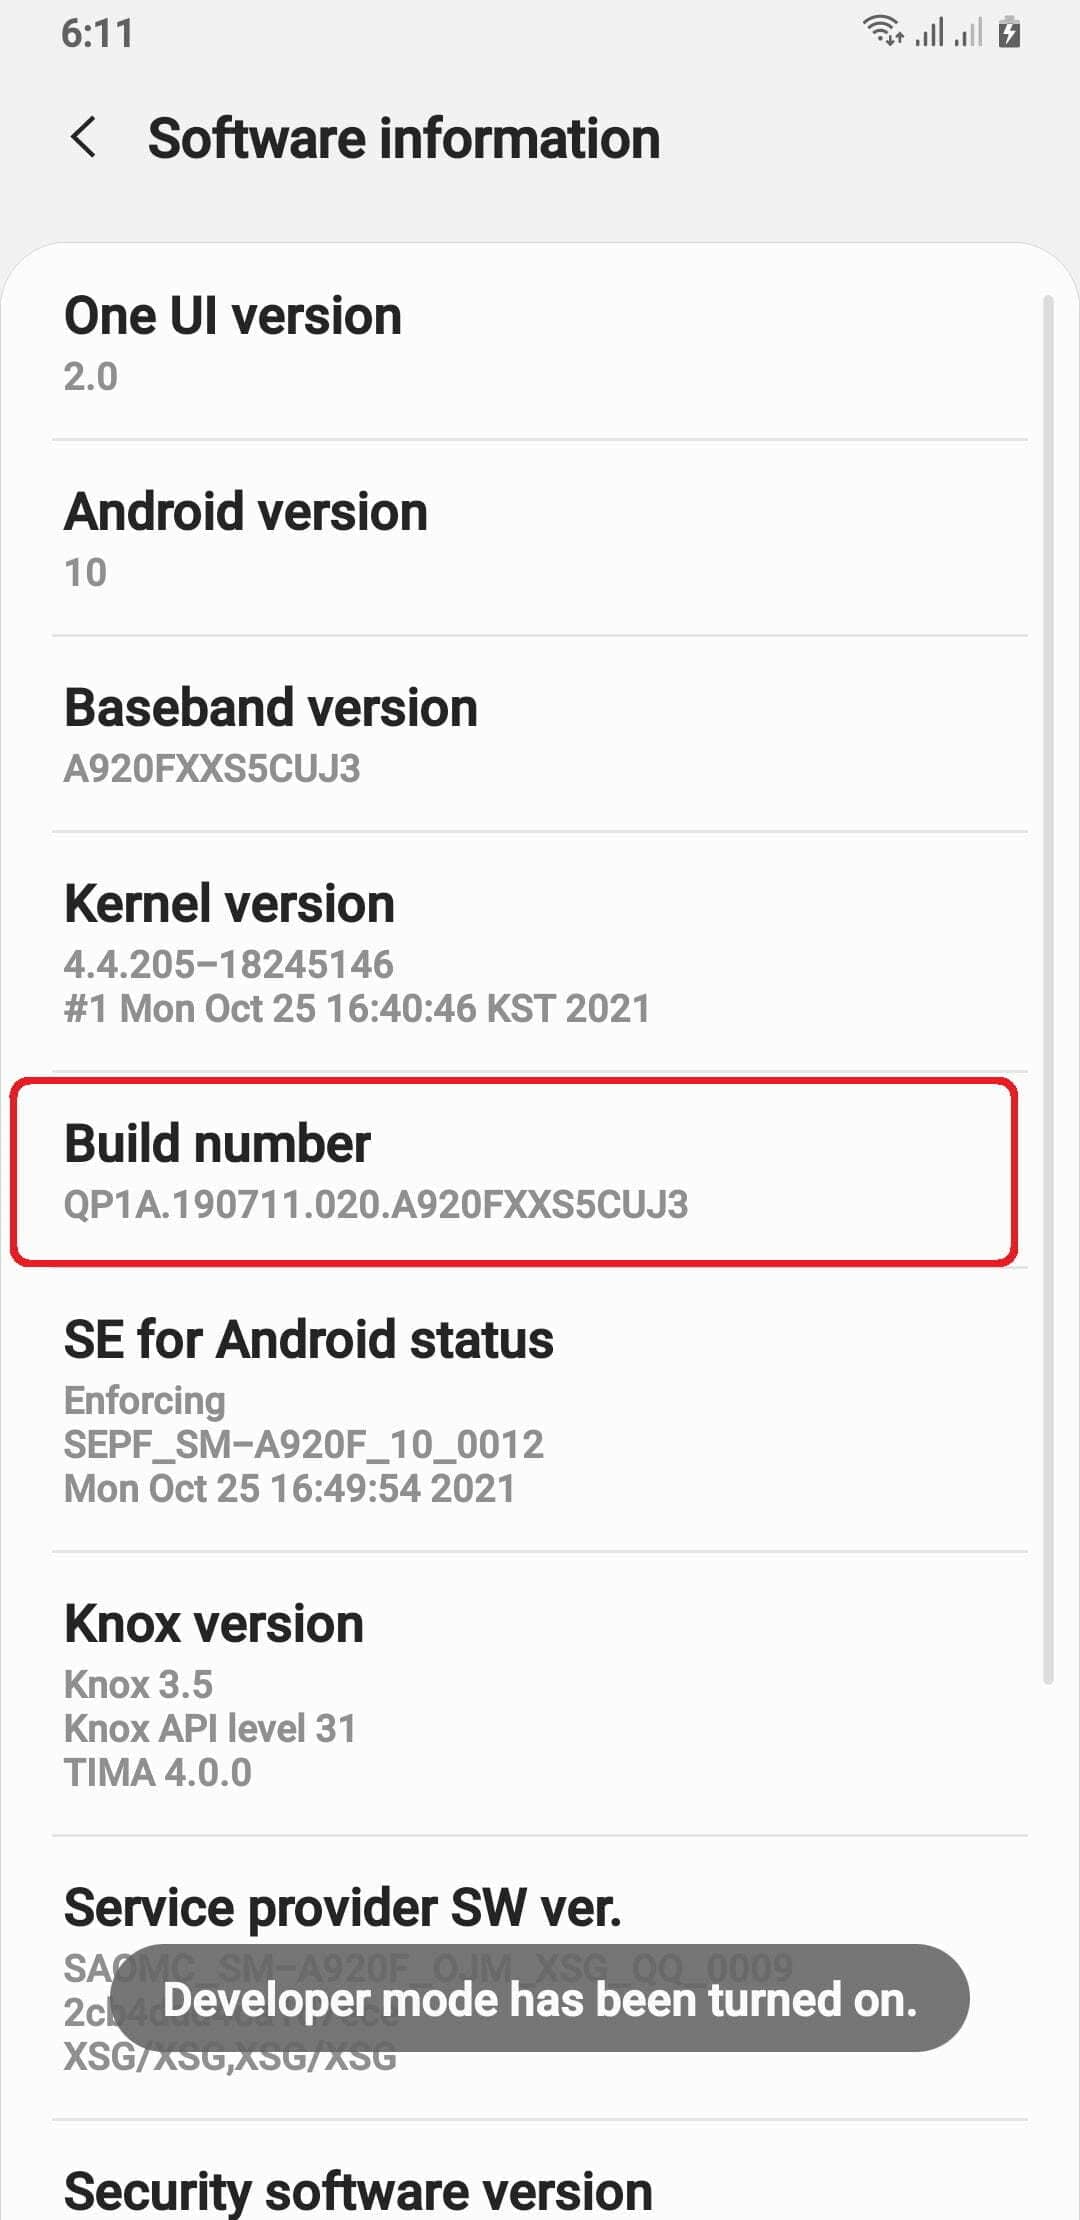
- From there, select “Software information”.
- Tap on the “Build Number” 7 times.
- If prompted, enter your phone’s lock screen password.
- You will now see the “Developer mode has been enabled!” message on the screen.

By following these steps, the developer option will be enabled on your Samsung Galaxy A13, giving you access to advanced settings and tools that will be needed for the TWRP installation process.
Second Step: Enable the OEM unlocking option on Samsung Galaxy A13
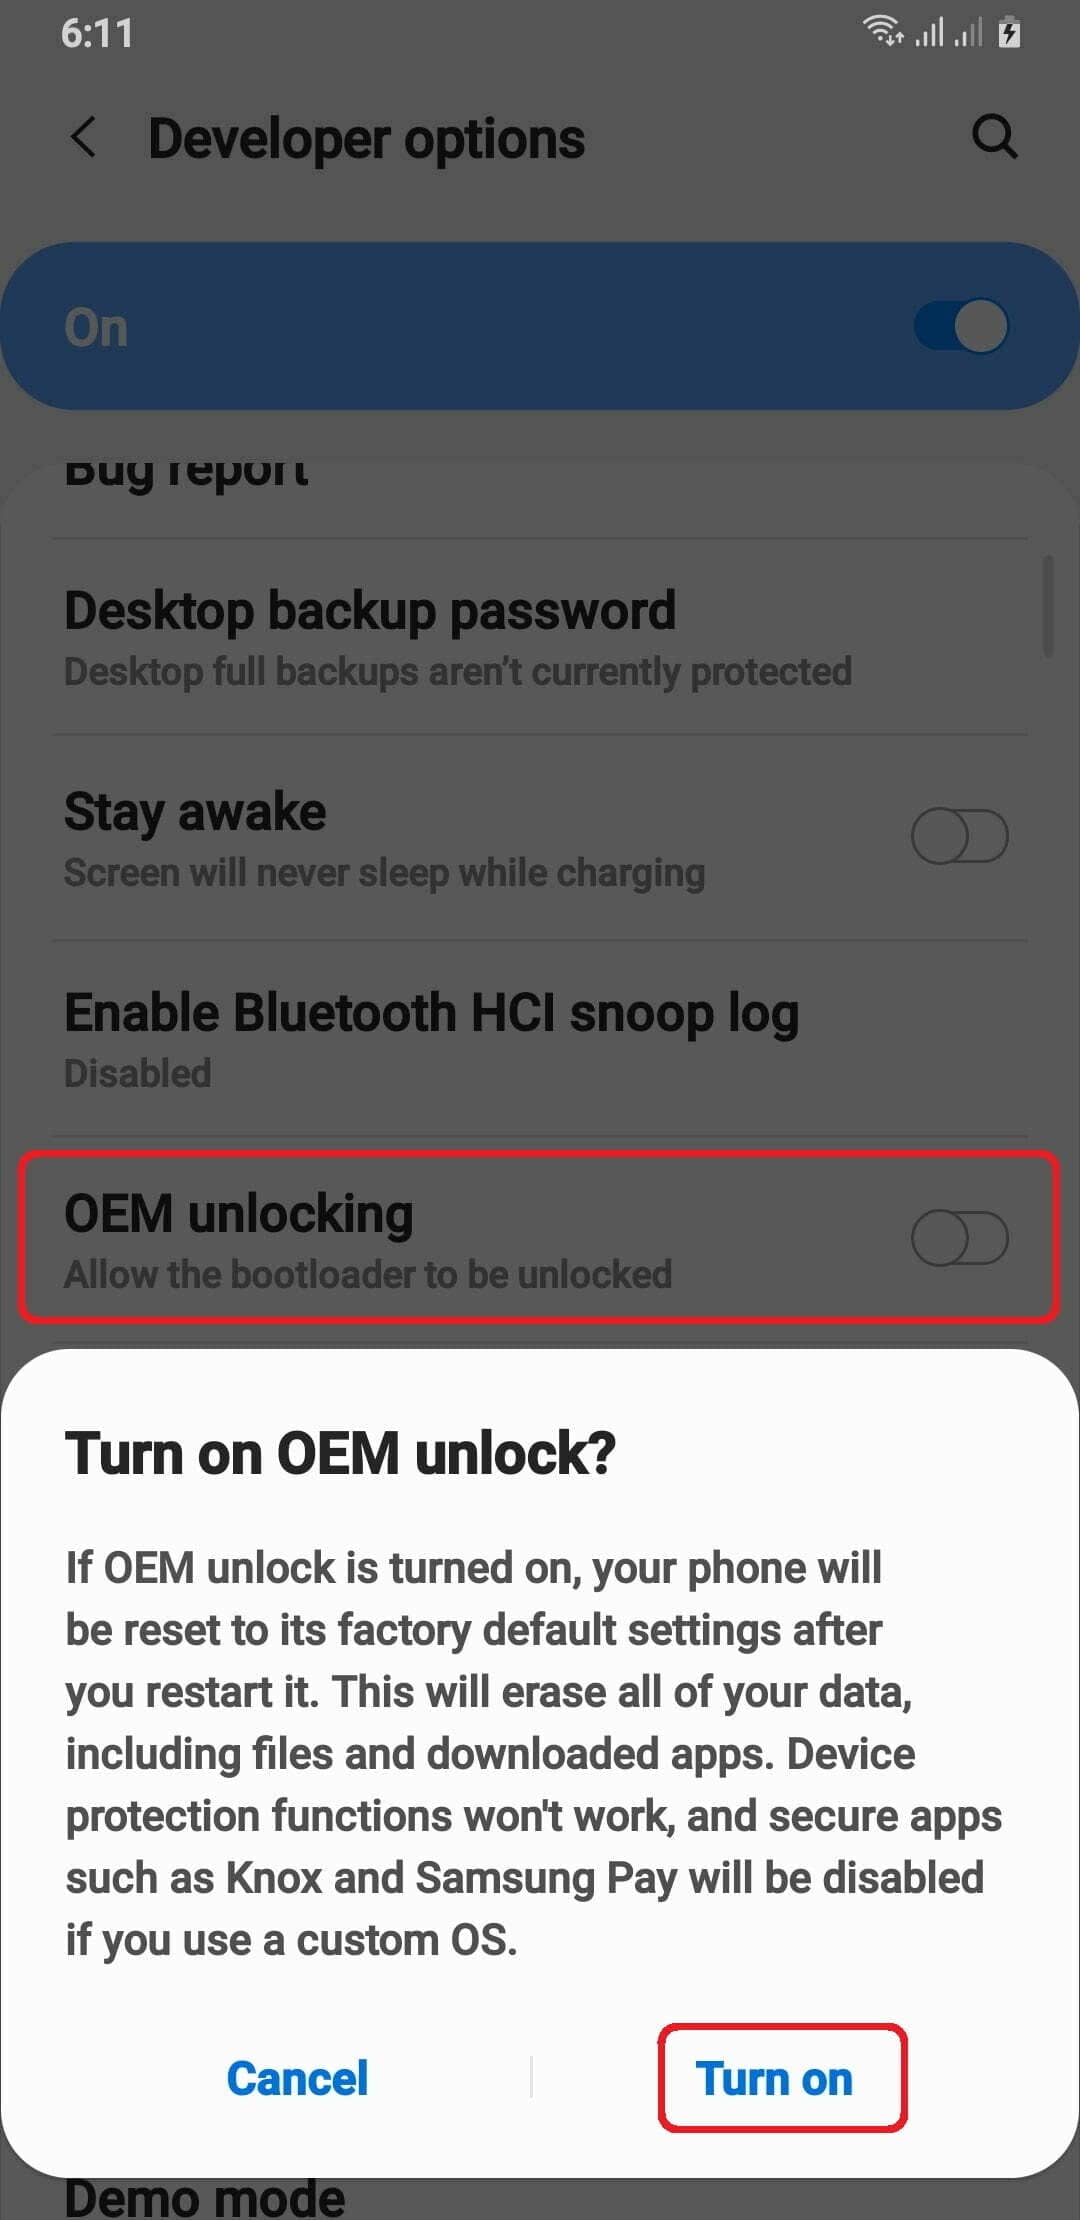
- Again, next Settings → Developer options → toggle ON the OEM unlocking option.

Third Step: Unlock the Bootloader
- Power off your phone and, keep pressing the “Volume Down”, “Volume Up” buttons simultaneously and connect phone to pc using data cable, you see the “Warning” screen.
- Keep press more than 7 second to “Volume Up” button to unlock bootloader option.
- You will be prompted to confirm whether you want to unlock the bootloader, use the volume buttons to navigate to ‘Yes’ and press the power button to confirm.

In this section, we will successfully unlock the bootloader of your Samsung Galaxy A13. This is a necessary step before installing TWRP recovery on your device. Unlocking the bootloader allows you to gain superuser access to your device, which is necessary for installing a custom recovery.
Entering Download Mode on Samsung Galaxy A13
Before installing TWRP on your Samsung Galaxy A13, you will need to enter download mode on your device. This is a necessary step to prepare your device for the TWRP installation process. To enter download mode on your Samsung Galaxy A13, follow these steps:
- Turn off your device.
- Press and hold the Volume Down and Volume Up buttons simultaneously and connect your phone to your PC using the data cable.
- When you see the “Warning” screen, press the Volume Up button to enter download mode.
Required Files for TWRP Installation
In this section, we will be providing you with the necessary files to install TWRP recovery on your Samsung Galaxy 13. These files include TWRP, Disable Dm Verity Force Encrypt, and vbmeta. Make sure to download these files and have them ready before proceeding with the TWRP installation process.
Please Note: that at the moment, an official TWRP recovery version is not available for the Samsung Galaxy A13. However, the TWRP recovery version that is provided in this article is from XDA forum and is considered to be stable for use. As of the date of this response, January 25th, 2023.
Download: TWRP
Download: vbmeta
Download: Disable DM Verity Forece Encrypt
Installing TWRP Recovery on Samsung Galaxy A13
In the next section, we will be providing a detailed installation guide for TWRP on your Samsung Galaxy A13. This guide will walk you through the process step-by-step. It’s important to follow this guide carefully, as it will ensure a successful TWRP installation on your Samsung Galaxy A13.
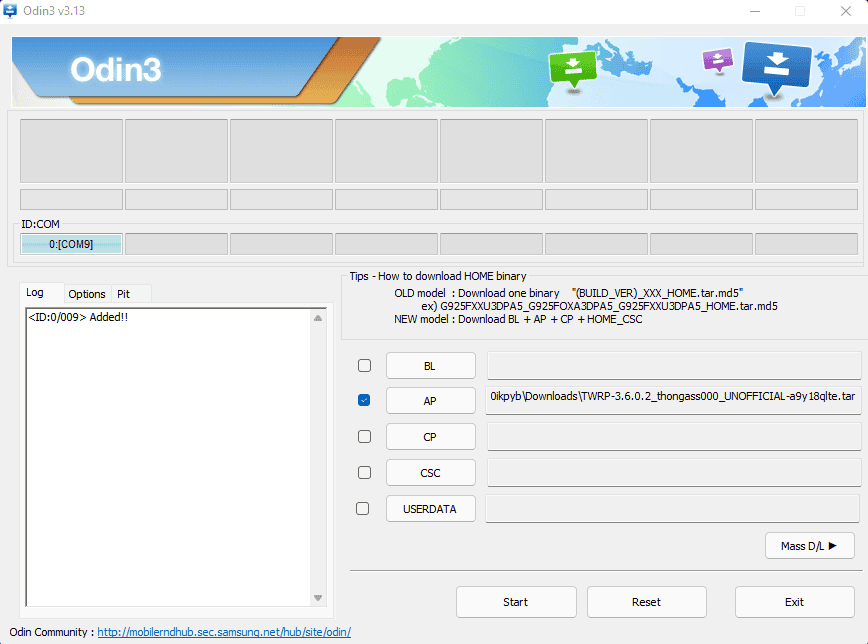
- Open the Odin tool on your PC.
- Select the vbmeta.tar file and load it as AP in Odin and flash it. After it’s done, reboot your phone to download mode.
- Next, flash the TWRP.tar file as AP via Odin. After the flashing is successful, immediately reboot to recovery mode by pressing the Volume Up and Power key buttons simultaneously until you see the “Boot Warning” screen then press power key to enter TWRP recovery mode.
- Flash the Disable Dm Verity Force Encrypt.
- Go to Wipe > Format data.
- Reboot to System or flash any additional modifications you desire.

How to Root Samsung Galaxy A13
Rooting your Samsung Galaxy A13 allows you to gain superuser access to your device, which gives you the ability to modify and customize your device’s software. If you’re interested in rooting your Samsung Galaxy A13, we recommend visiting our in-depth guide on how to root your device. It will provide you with all the information you need to successfully root your Samsung Galaxy A13 and gain full control over your device.
Read this: How to Root Samsung Galaxy A13 using Magisk
Conclusion
In conclusion, Installing TWRP recovery on your Samsung Galaxy A13 is a great way to gain advanced control over your device. With TWRP, you can install custom ROMs, kernels, and other mods that are not available through the official firmware. It also allows you to create and restore backups, which is particularly useful if you’re experimenting with different software or if you ever need to roll back to a previous version. We hope this guide has been helpful and that you are now able to successfully install TWRP recovery on your Samsung Galaxy A13.

If you click on the ‘DOWNLOAD TWRP’ link that you have and look fir the A13, it’s not on there. Am I missing it?
Official TWRP is not available for your device, so please search on the internet. You will find unofficial TWRP.
Since this article is for Samsung A13 I think you should put a link to download it directly for Samsung A13. Here’s an unofficial one I found: …
Thank you for the suggestion, but there is no developer mentioned and also the code is not available. If it is available on GitHub or the XDA Developer Forum, I would be happy to include a link to it.
Link to xda unofficial twrp is actually a link to twrp website. All I find is A13F when I Google. Do you have a link to what I would need to pull off my A13U for TWRP to be made and or modified?
All I can find is A13F unofficial. Do you have any links for how to get the information required to make twrp aka send in the data to team win? I can pull anything I want. I just have not researched how to use that to root with out all these programs just using Fastboot and adb