Just two days ago, Google released the second developer preview of Android 14 exclusively for Pixel devices. This release comes with a range of new features and improvements that developers can test and build their apps for the upcoming version of Android. However, if you don’t have a Pixel device and want to experience Android 14, don’t worry! You can still install the developer preview on any Android device that supports Project Treble.
Project Treble is an initiative by Google to streamline the Android update process and make it easier for device manufacturers to release updates faster. Essentially, it separates the vendor implementation from the Android OS framework, enabling faster updates without the need for device-specific modifications. If your Android device supports Project Treble, you can install the Android 14 developer preview and experience the latest features firsthand. In this article, we’ll guide you through the process of installing Android 14 on your Android device.
Table of Contents
What is an Android Developer Preview?
An Android Developer Preview is an early version of the upcoming Android operating system that Google releases to developers for testing purposes. It’s a way for developers to explore new features and APIs, test their apps for compatibility, and provide feedback to Google. Developer Previews are typically released several months before the official public release of the new Android version. They may be unstable and contain bugs, so they are not recommended for everyday use by regular users. Instead, they are intended for developers who want to prepare their apps for the new version of Android and provide feedback to Google on issues or bugs they encounter.

Checking Your Device’s Compatibility with the Android Developer Preview
Before installing the Android 14 Developer Preview on your device, it’s important to check if your device supports Project Treble. As we will be using a ported GSI ROM, it’s important to note that your phone should support Project Treble for the installation to work. You can check if your device supports Project Treble by downloading the Project Treble app from the Google Play Store. Once you’ve confirmed that your device supports Project Treble, you can proceed with the installation process.

However, please note that installing a Developer Preview on your device may cause stability issues or even brick your device, so proceed with caution and make sure to backup your device before proceeding.
Downloading Android 14 Developer Preview GSI
Before you can install Android 14 on your Project Treble phone, you need to download the Android 14 developer preview GSI image. You can find the developer preview Android 14 developer preview ported GSI ROM on the web by following the download link below.
Download: Android 14 Ported GSI
Installing Android 14 Developer Preview via TWRP
If you have installed TWRP on your Android device, you can follow these steps to install Android 14 developer preview. Here are the steps to install Android 14 Developer Preview via TWRP:
- Power off your phone.
- Boot into custom recovery mode (e.g. TWRP).
- In TWRP, select Wipe, and then swipe to wipe Dalvik Cache, Cache, System, and Data.
- Select Install, then navigate to the location where you saved the Android 14 GSI system image and select it.
- Swipe to confirm the installation.
- Flash Magisk Zip (it’s needed for boot).
- (Optional) Flash a custom kernel if available.
- (Optional) Flash a custom vendor if available.
- Reboot to the system.
This is the process for installing Android 14 using a custom recovery. Once your phone has rebooted successfully, you should now be running Android 14 on your Project Treble Phone.
Installing Android 14 Developer Preview via ADB Fastboot Commands
ADB Fastboot is a powerful tool that allows you to control your Android device from a computer. You can use it to flash GSI ROMs, custom ROMs, kernels, and other mods. If you are comfortable with using the command line, ADB Fastboot is a great way to install Android 14 on your device.
Step 1: Download the necessary files
Download the necessary files from the links below:
SDK Platform Tool: SDK Platform Tool
Generic System Image (GSI): Download GSI
Verified Boot Metadata (vbmeta) Image: Download vbmeta
Step 2: Launching Command Prompt
- Extract the downloaded SDK Platform Tool.
- Opening the extracted SDK Platform Tool Folder.
- Launching Command Prompt from the Same Folder:
To execute commands for the SDK Platform Tool, you need to open a Command Prompt window from within the SDK Platform Tool folder. Follow these steps:
Windows: Open the extracted SDK Platform Tool folder. In the folder’s address bar (top bar), type “cmd” and press Enter. This will launch the Command Prompt window with the current directory set to the SDK Platform Tool folder.
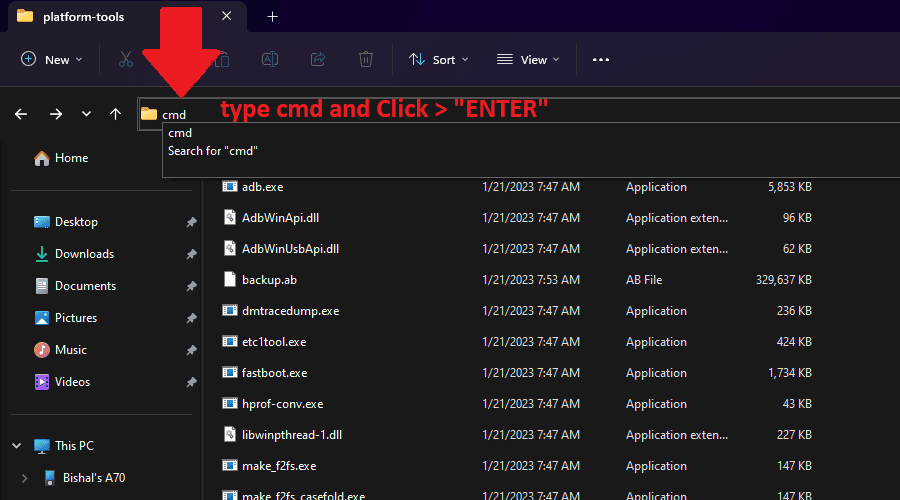
macOS and Linux: Open the Terminal. Use the “cd” command to navigate to the extracted SDK Platform Tool folder. For example, if the folder is on your desktop, you would use the command cd ~/Desktop/sdk-platform-tool. Once you’re in the correct folder, you can proceed with using the Terminal for SDK Platform Tool commands.
Step 3: Unlocking the Bootloader
In this section, we will be unlocking the bootloader on your Android device. This is a necessary step if you want to root your device, install a custom ROM, or use other advanced features. Please follow all of the steps carefully:
To enable developer options:
- On your Android device, go to Settings > System > About phone.
- Tap the Build number seven times.
- You will see a message saying that you are now a developer.
- Go back to Settings > System.
- Tap Developer options.
To enable OEM unlocking:
In Developer options, scroll down and find the OEM unlocking setting.
Tap the toggle switch to enable OEM unlocking.
You may be prompted to confirm that you want to enable OEM unlocking.
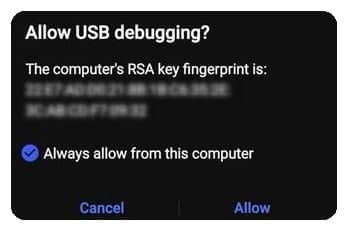
To enable USB debugging:
- In Developer options, scroll down and find the USB debugging setting.
- Tap the toggle switch to enable USB debugging.
- You may be prompted to confirm that you want to enable USB debugging.
Once you have enabled developer options, OEM unlocking, and USB debugging, you can proceed with unlocking the bootloader.
To unlock the bootloader:
Open a command prompt in the folder where the Android SDK Platform Tools are installed.
Type the following command and press Enter:
adb devicesThis will list all of the devices that are connected to your computer. If your Android device is connected, it should be listed in the output.
You may be prompted to confirm that you want to enable USB debugging.
Type the following command and press Enter:
adb reboot bootloaderThis will reboot your Android device into bootloader mode.
Once your device is in bootloader mode, type the following command and press Enter:
fastboot flashing unlockThis will unlock the bootloader on your device.
Your device will reboot and the bootloader will be unlocked.
Note: Unlocking the bootloader will erase all data on your device. Make sure to back up your data before proceeding.
Step 4: Rebooting to Fastboot Mode
After unlocking the bootloader, your device will reboot. Once it has rebooted, you will need to reboot it back into fastboot mode in order to flash a custom ROM or other files.
To do this type the following command in the command prompt:
adb reboot fastbootThis will reboot your device into fastboot mode.
Here are some additional things to keep in mind:
- The adb reboot fastboot command may not work on all devices.
- If the adb reboot fastboot command does not work, you can try rebooting your device into bootloader mode manually by first power off phone and pressing and holding the Power and Volume down buttons at the same time until you see the bootloader screen.
Step 5. Disable vbmeta Verification and Flash vbmeta Image
Once your device is in fastboot mode, you can disable vbmeta verification and flash the vbmeta image with the following command:
fastboot --disable-verification flash vbmeta vbmeta.imgThe fastboot flashing disable-verity command will disable vbmeta verification, which is a security feature that prevents unauthorized modifications to the vbmeta image. The fastboot flashing vbmeta vbmeta.img command will flash the vbmeta image to your device.
Step 6. Rebooting to Fastboot Mode After Flashing vbmeta
Once you have successfully flashed the vbmeta image, you need to reboot your device back into fastboot mode in order to flash a custom ROM or other files.
To do this, type the following command in the command prompt:
fastboot reboot fastbootStep 7. Confirming That vbmeta Verification Is Disabled
Once you have rebooted your device back into fastboot mode, you can confirm that vbmeta verification is disabled by using the command fastboot getvar is-userspace.
To do this, type the following command in the command prompt:
fastboot getvar is-userspaceStep 8. Erase System Partition
Once you have confirmed that vbmeta verification is disabled, you can erase the system partition on your device. This will delete all of the data on the system partition, including the Android operating system.
To erase the system partition, type the following command in the command prompt:
fastboot erase systemStep 9. Delete Logical Partitions
Once you have erased the system partition, you can delete the logical partitions. The logical partitions that you need to delete will depend on the type of partition that you erased in step 8.
- If you erased the system_b partition in step 8, then you need to delete the product_b logical partition.
- If you erased the system_a partition in step 8, then you need to delete the product_a logical partition.
- If you only erased the system partition in step 8, then you need to delete the product logical partition.
To delete a logical partition, you can use the following command:
fastboot delete-logical-partition product_bfastboot delete-logical-partition product_afastboot delete-logical-partition productStep 10. Flash the System Image
Once you have deleted the logical partitions, you can flash the system image to your device. The system image is the core of the Android operating system, and it contains all of the essential files and drivers that your device needs to boot and run.
To flash the system image, you need to use the following command:
fastboot flash system system.imgStep 11. Reboot to Recovery
Once you have flashed the system image, you need to reboot your device into recovery mode. Then you can format the data and reboot to the normal Android operating system.
fastboot reboot recoveryRemember to replace placeholders like vbmeta.img, system.img, product_insertslothere, product_a, product_b, and product with actual filenames or partition names relevant to your device and ROM.
Conclusion
In conclusion, installing Android 14 Developer Preview on any Project Treble phone is a relatively straightforward process. Whether you choose to install it via custom recovery or fastboot commands, it is essential to ensure that your phone supports Project Treble, has an unlocked bootloader, and is equipped with the necessary software and tools.
This comprehensive guide has covered all the important steps and details to help you successfully install Android 14 on your device. If you have any problems, please feel free to comment below and I will do my best to help you.
Why is there no modified ROM for the Redmi Note 11 Pro 4G phone?
Custom ROMs for the Redmi Note 11 Pro may become available in the future. For now, you can use a GSI ROM that works on your phone.
Can i install this on my Huawei P20 Lite (ANE-LX1)?
Hello! Based on your phone model, the Huawei P20 Lite (ANE-LX1), it supports Project Treble. If you follow the article guide and everything goes smoothly, you may be able to boot the new android 14 system.
Thanks i will try it