Are you ready to take your Samsung Galaxy A10s to the next level? Installing a custom recovery is the first step in unlocking the full potential of your device. TWRP, one of the most popular custom recoveries available for Android devices, provides a user-friendly interface and makes it easy to install custom software on your phone.
In this guide, we’ll walk you through the process of installing TWRP custom recovery on your Samsung Galaxy A10s. With TWRP, you’ll be able to install custom ROMs, kernels, and mods that can enhance your phone’s performance, battery life, and overall functionality.

Whether you’re already familiar with rooting or just starting out, this guide will provide you with all the information you need to install TWRP custom recovery on your Samsung Galaxy A10s. So, let’s get started and take control of your device today.
Table of Contents
Preparing Your Samsung Galaxy A10s for TWRP Installation
In this section, we will be preparing your Samsung Galaxy A10s for TWRP installation. This includes unlocking the bootloader and enabling developer options. These steps are crucial before installing TWRP recovery on your device, as they allow you to modify the device’s software. Make sure to follow these steps carefully, as they are important for a successful TWRP installation.
Should this Remember
- Remove all accounts (Google, Samsung) from your device before proceeding.
- Take a full backup of your Android device.
- You will need a PC to perform the Odin process.
- Make sure your phone is fully charged.
- Have the original USB cable for your Samsung Galaxy A10s on hand.
Unlock the Bootloader on Samsung Galaxy A10s
Before you can install a custom recovery like TWRP on your Samsung Galaxy A10s, you need to unlock the device’s bootloader. The bootloader is a low-level piece of software that boots up the operating system on your device. By unlocking the bootloader, you’re essentially telling the device to allow the installation of custom software. This process can seem a bit intimidating, but it’s actually quite straightforward if you follow the steps correctly. In this guide, we’ll be taking you through the process of unlocking the bootloader on your Samsung Galaxy A10s, so you can install a custom recovery and start exploring the custom recoveries.
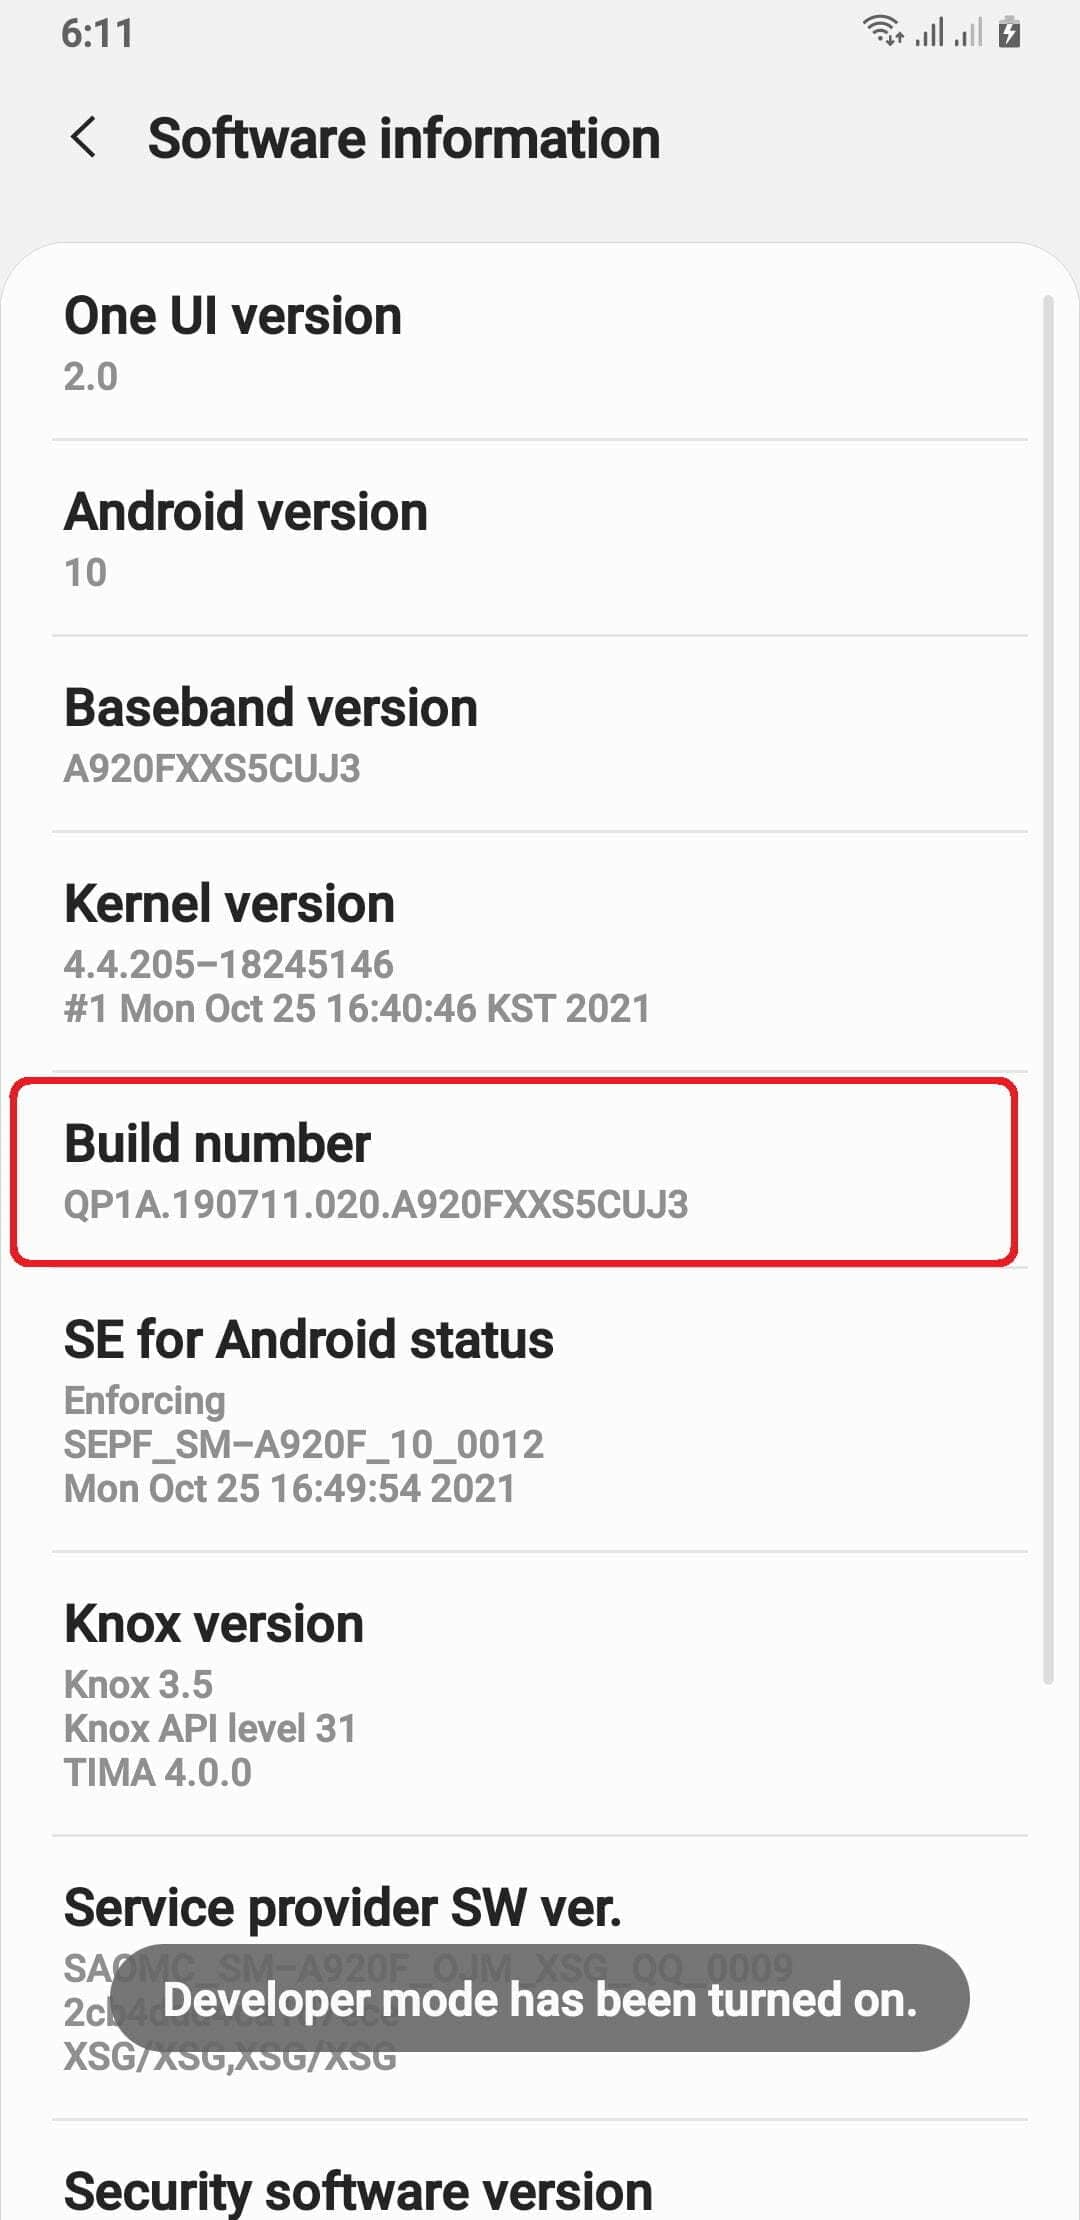
Enable the Developer Options on Samsung Galaxy A10s
- First go to “Settings” on your Samsung Galaxy A10s
- Scroll bottom of the screen and select “About phone”
- Then select “Software information”
- Enter your phone’s lock screen Password if prompted
- Next you will now see the “Developer mode has been enabled!” toast message on the screen.

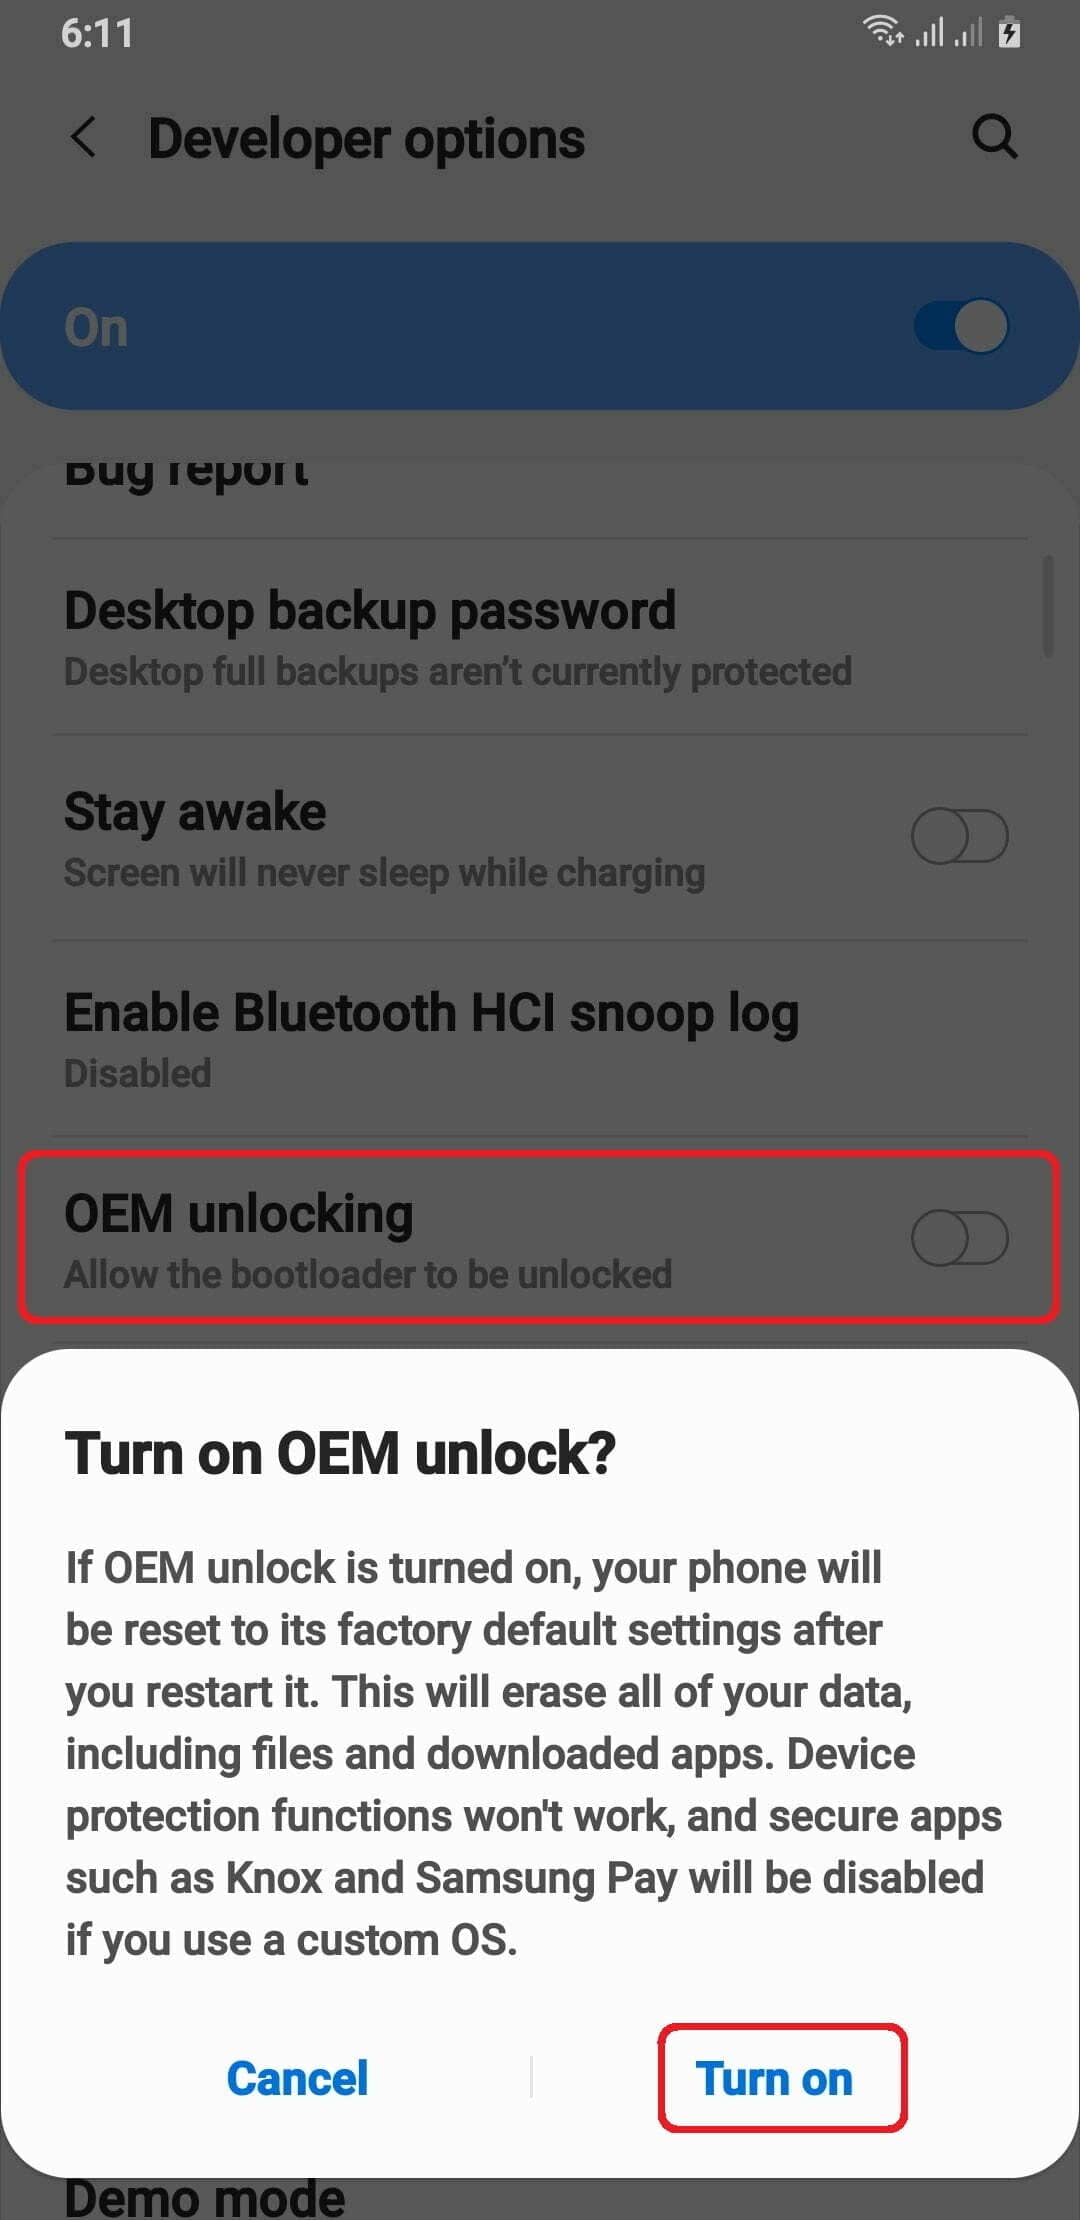
Enable the OEM unlocking option on Samsung Galaxy A10s
- Again, next Settings → Developer options → toggle ON the OEM unlocking option.

Unlock the Bootloader
- Power off your phone and, keep pressing the “Volume Down”, “Volume Up” buttons simultaneously and connect phone to pc using data cable, you see the “Warning” screen.
- Keep press more than 7 second to “Volume Up” button to unlock bootloader option.
- You will be prompted to confirm whether you want to unlock the bootloader, use the volume buttons to navigate to ‘Yes’ and press the power button to confirm.
In this section, we will successfully unlock the bootloader of your Samsung Galaxy A10s. This is a necessary step before installing TWRP recovery on your device. Once the bootloader is unlocked, your phone will be ready for TWRP installation, and you will be able to modify the device’s software.
Accessing Download Mode on Samsung Galaxy A10s
In this section, we will be showing you how to access download mode on your Samsung Galaxy A10s. This mode is necessary for flashing firmware and installing TWRP recovery on your device. It allows the device to communicate with Odin, the software used to flash firmware on Samsung devices. Make sure to follow the steps carefully and your device will be in download mode ready to proceed with the next step.
- Switch off your device.
- Press and hold the Volume Down and Volume Up buttons simultaneously and connect your phone to your PC using the data cable.
- When you see the “Warning” screen, press the Volume Up button to enter download mode.

By following these steps, you will successfully enter download mode on your Samsung Galaxy A10s.
Required Files for TWRP Installation
In this section, we will be providing you with the necessary files to install TWRP recovery on your Samsung Galaxy A10s. These files include TWRP, Disable Dm Verity Force Encrypt, and vbmeta. Make sure to download these files and have them ready before proceeding with the TWRP installation process. These files are essential for a successful TWRP installation and unlocking the full potential of your device.
Download: TWRP
Download: vbmeta
Download: Disable DM Verity Forece Encrypt
Installing TWRP Recovery on Samsung Galaxy A10s
In this section, we will be proceeding with the actual installation of TWRP recovery on your Samsung Galaxy A10s. Your device is now in download mode and ready to be flashed with the TWRP recovery image. Make sure to follow the instructions carefully and your device will have the TWRP recovery installed in no time.
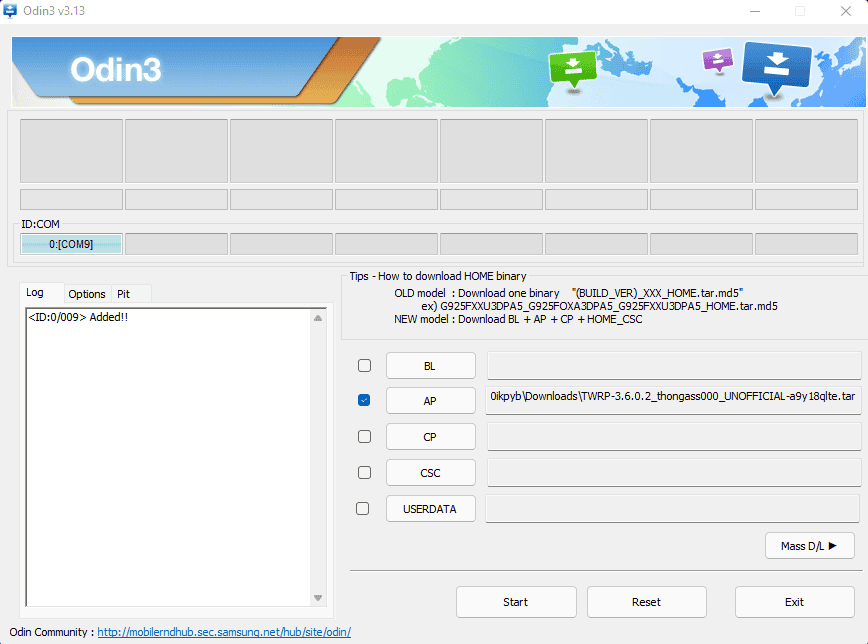
- Open the Odin tool on your PC.
- Select the vbmeta.tar file and load it as AP in Odin and flash it. After it’s done, reboot your phone to download mode.
- Next, flash the TWRP.tar file as AP via Odin. After the flashing is successful, immediately reboot to recovery mode by pressing the Volume Up and Power key buttons simultaneously until you see the “Boot Warning” screen then press power key to enter TWRP recovery mode.
- Flash the Disable Dm Verity Force Encrypt.
- Go to Wipe > Format data.
- Reboot to System or flash any additional modifications you desire.

By following these steps, you will successfully install TWRP recovery on your Samsung Galaxy A10s.
How to Root Samsung Galaxy A10s
In this final section, we will be showing you “How to Root Samsung Galaxy A10s” using the TWRP recovery that you have just installed. Rooting your device allows you to gain full control over your device and unlock its full potential. For detailed step-by-step instructions on how to root your Samsung Galaxy A10s, you can follow this link to our guide:
Read this: How to Root Samsung Galaxy A10s
Make sure to follow the instructions carefully to avoid any issues and enjoy the benefits of a rooted Samsung Galaxy A10s.
Conclusion
In this guide, we have walked you through the process of installing TWRP recovery on your Samsung Galaxy A10s. We have provided step-by-step instructions on how to prepare your device, enter download mode, and install TWRP recovery. We have also provided you with the required files and links to other guides to help you fully unlock the potential of your device. Remember to always read and follow the instructions carefully, and if you have any questions, feel free to ask. Now that you have TWRP recovery installed on your Samsung Galaxy A10s, you can now proceed to root your device and enjoy all the benefits that come with it.